# Road to Yuzu w/o Switch
This Repo explains how to install the Yuzu Nintendo Switch Emulator -- without a Switch -- on a Windows PC. I distance myself from piracy and I own any/all of these games shown in the original screenshots and gifs. If you use anything out of this please credit me appropriately!
[](https://twitter.com/PoolPartyAkali)
[Ryujinx Version](https://github.com/PrincessAkira/road-to-ryujinx-without-switch)
- [Introduction](#introduction)
- [Guide](#guide)
- [Yuzu Setup](#setup)
- [Files](#files)
- [Settings](#settings)
- [Games](#games)
- [Dump Games](#dump-games)
- [Additional](#additional)
- [Compatability](#compatibility)
- [Game Updates](#game-updates)
- [Uninstalling Game Updates](#Uninstalling-Game-Updates)
- [Log Files](#log-files)
- [BCAT](#bcats)
- [Shaders](#shaders)
- [Mods/Patches](#mods)
- [Goodbye](#goodbye)
# Introduction
Hey, im Sarah and I'm writing you a guide on how to install yuzu without having a Switch, since I discovered this is literally a pain in the ass. I try to make it as easy as possible, but be sure to check this out if you need new keys, since I try to keep this always up-to-date! <3
# Guide
# Manual Setup
## Setup
First you will need [Yuzu](https://pineappleea.github.io/). Download it, open it in WinRar, 7ZIP idk, and then move the contents in a folder and open the file yuzu.exe.
Yuzu will open and show this screen:
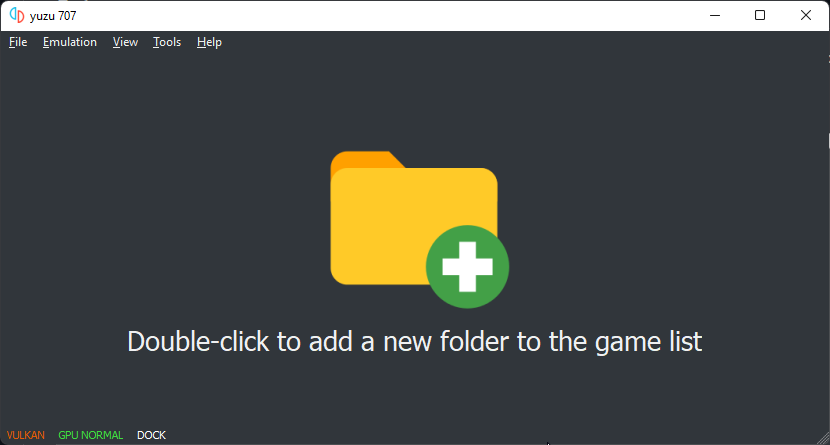
On this screen, click `Emulation -> Configure -> System -> Profile`
Then press on `Add` and make a new profile, then close Yuzu.
## Files
Inside of Yuzu, click `File -> Open Yuzu folder`. This will open the Yuzu configuration folder inside of explorer.
Create a folder called "keys" and copy the keyfile you got from [128 Bit Bay](https://rentry.org/128bbkeys).
Note: The File name should be prod.keys, not prod.keys.txt.
## Settings
For settings, open Yuzu, and select: `Emulation -> Configure -> Graphics -> OpenGL` and set it to Vulkan or OpenGL. With the new improvements since this guide came out, Vulkan is now a viable option! Then go to Controls and press Single Player yadiyadiyada and set it to something like this
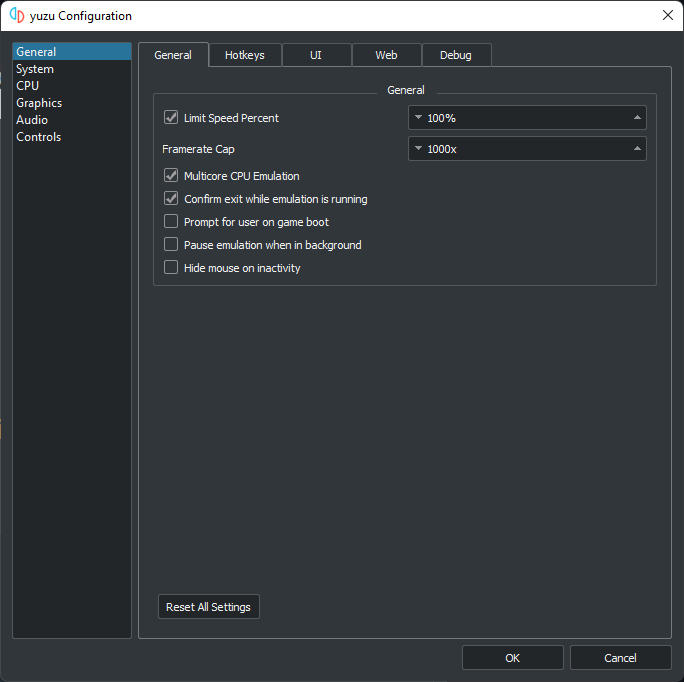
Then press `Configure` and set Player 1 to:
- Pro Controller if you have a controller/keyboard
- Joycons if Joycons.
Press `Configure` and press the excat buttons on your controller. (It's easier for Xbox, but for you PS4 and keyboard users I have a graphic [here](https://compass-ssl.xboxlive.com/assets/c7/a1/c7a12fbe-af04-4a90-92f2-18338219c2aa.png?n=one-controller-front-l.png))
After you're done press `Okay` and continue to the next step.
## Games
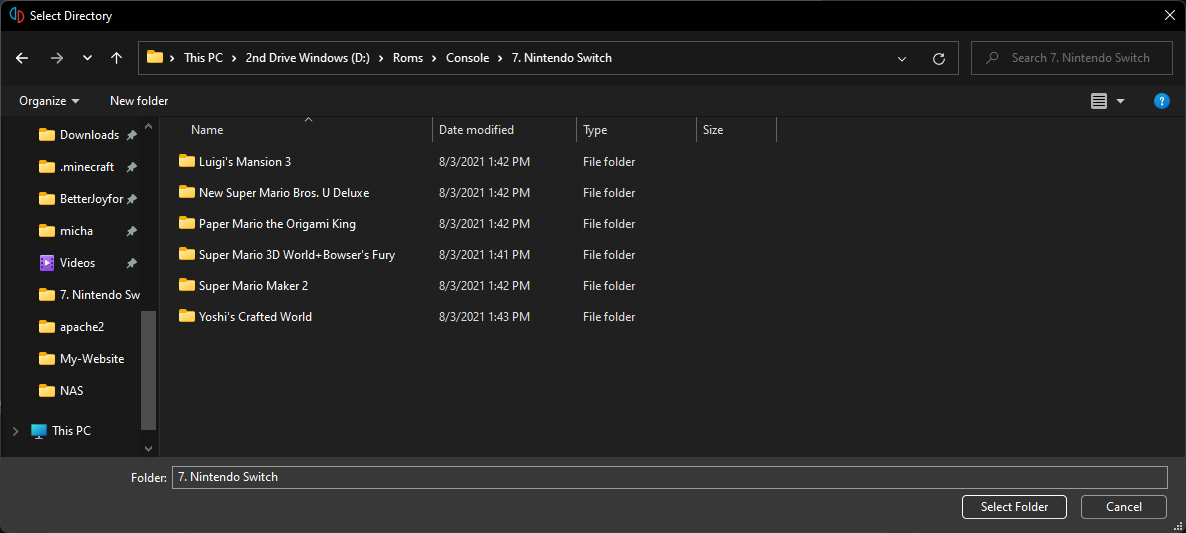
Download any ROM you want from any ROM website you like, or, if you aren't a pirate, dump it from your Switch. After you got your File (can be .xci or .nsp) create a folder somewhere on your PC and in that folder create another folder for your game. After that double-click into Yuzu and select the folder you put your game folder in.
## Dump-Games
I found a very good guide that can be found [here](https://wiki.no-intro.org/index.php?title=Nintendo_Switch_Dumping_Guide)
When you have the XCI, just do the same as in the step above.
# Additional
## Compatibility
For a list of games compatible, look [here](https://yuzu-emu.org/game/).
## Game-Updates
Download the update of your game or DLCs, usually as a .nsp. Put it in your folder of the game, then open yuzu. To install it, follow the steps in this gif.
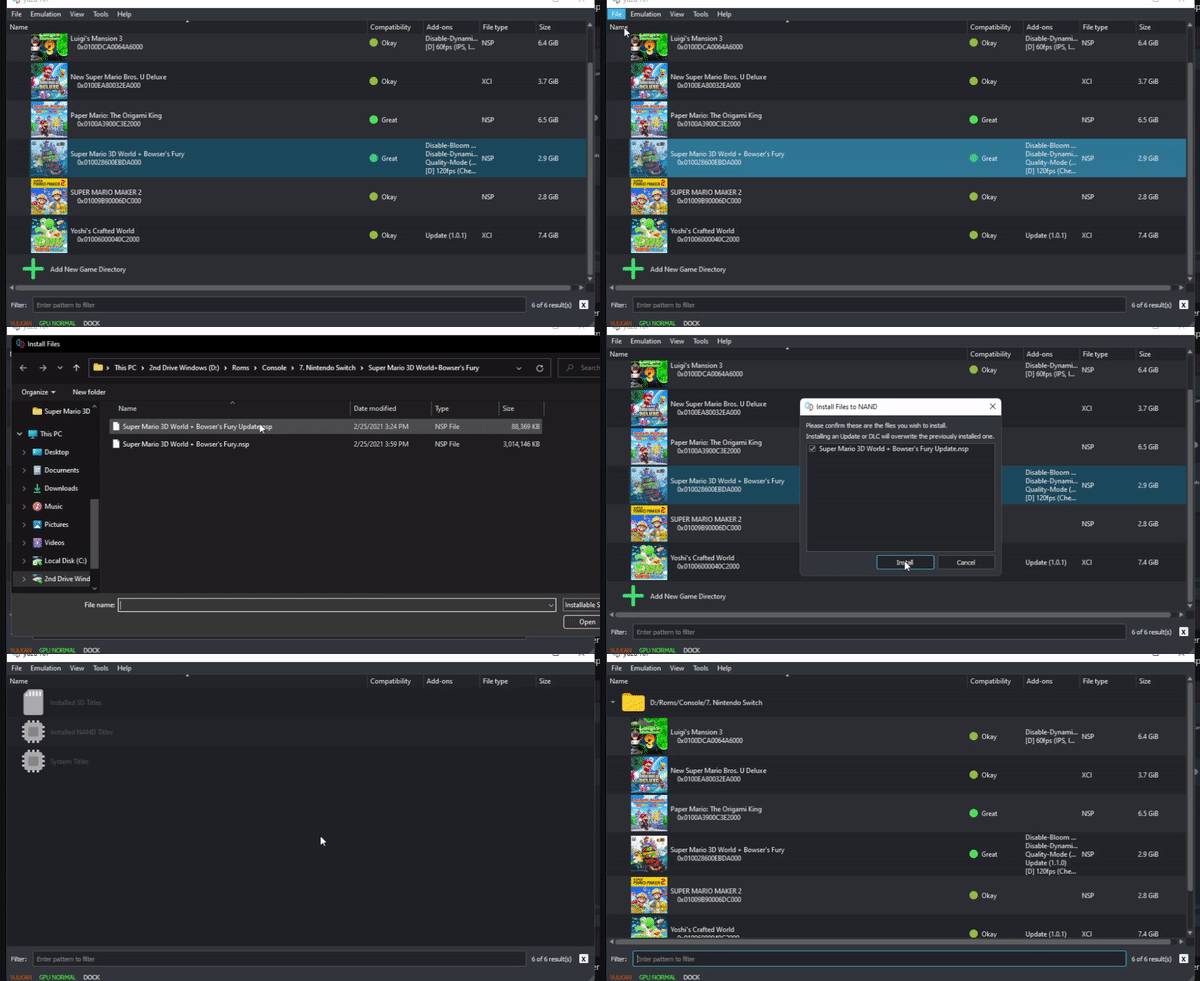
If it says that it is already installed, your ROM likely already has that DLC/Update preinstalled, don't worry, if it breaks the game, just follow the steps in the next section.
## Uninstalling-Game-Updates
Open Yuzu, and find the game that has an update that you want to uninstall. Then follow the steps of the gif below.
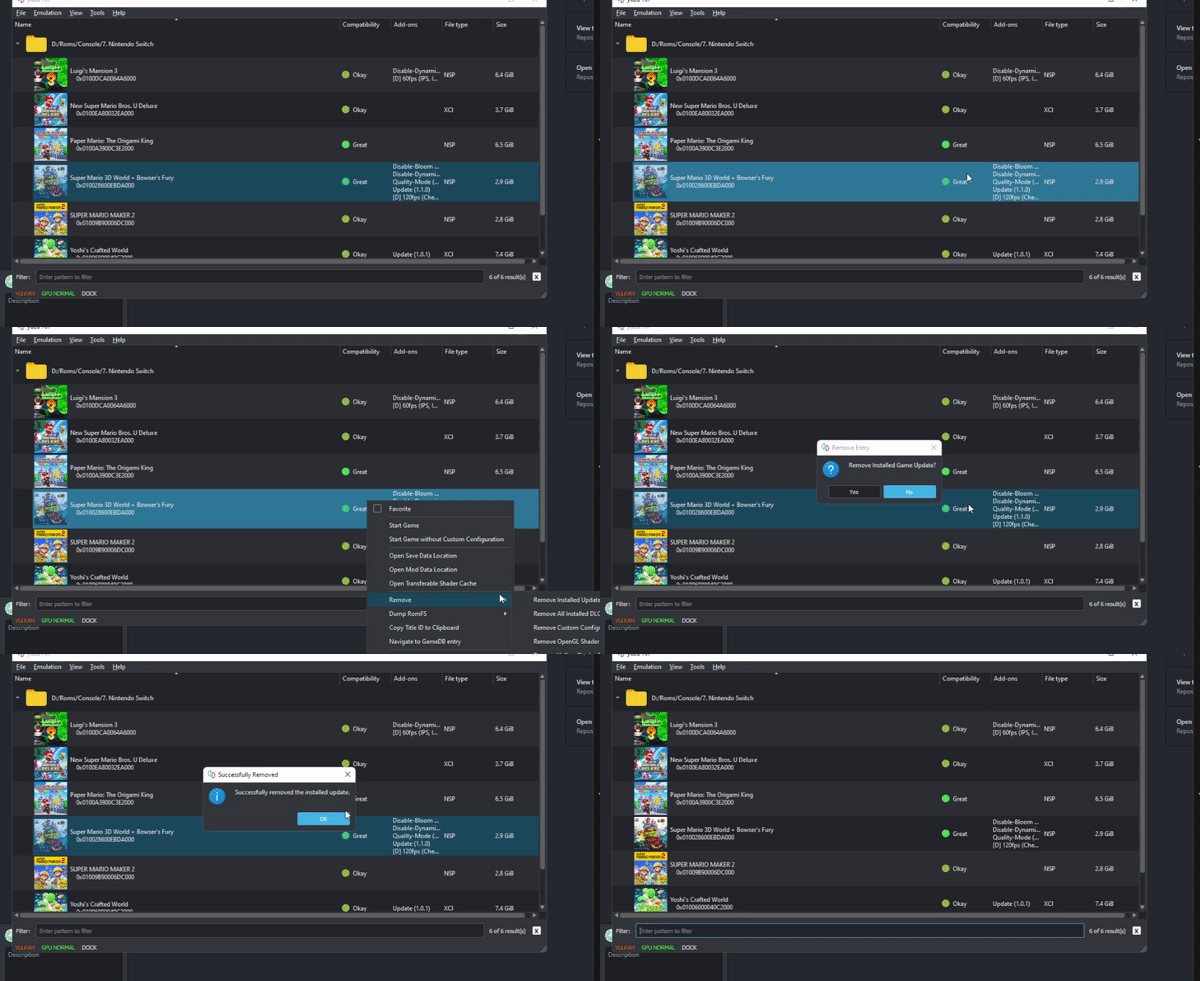
If it says that there are no updates to uninstall, that means exactly what it says, there are no preinstalled updates, and no manually user-installed updates either.
## Log-files
- Windows: Open the Run prompt (Windows Key + R) and type this in, "%appdata%\yuzu" then head to the logs directory
- MacOS: How about waiting until yuzu comes out on MacOS.......
- Linux: Open your file manager of choice, make sure that Show Hidden Files is ENABLED, and head to the following directory, "/home/YourUsername/.local/share/yuzu" and open the logs directory.
# BCATS
What's a BCAT?
It stands for BoxCat, and it's Nintendo's sending you In-game Gifts. On an Emulator this, it doesn't work like it would on a Switch, due to the emulator not connecting to Nintendo's servers. To work around this, Yuzu has its own way of giving you these.
To enable this, go in the menu and choose `Boxcat`.
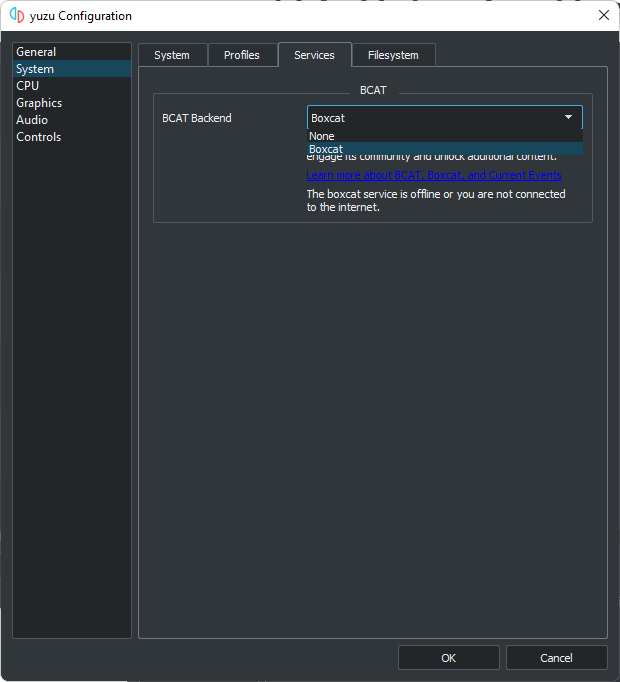
A list of all the stuff you can get can be found [here](https://yuzu-emu.org/help/feature/boxcat/)
# Shaders
To get shaders, go [here](https://github.com/JENOVAAbsolute/128BB-Shaders).
Download the one you need and then right click on the game. Open `Transferable Pipeline Cache`, and paste contents in.
# Mods
It's pretty simple, as an example, we're gonna take the mod from [here](https://gbatemp.net/threads/pokemon-mystery-dungeon-dx-60-fps-mod.559469/). When you download the zip file you will have a folder called `exefs_patches`. Go inside that folder and in the other folder in there until you are at this file with the .ips extension.

Then move that IPS file into `exefs_patches` and delete the now empty folder, then rename `exefs_patches` to `exefs`.
Now open Yuzu, right click your game, and `Open Mod Directory`. Create a new folder with the name that you want for the patch (you can name it anything you want).
Then move the `exefs` folder into the folder that you just made, restart Yuzu, and you're done.
You now see your mod at compatibility.
There are multiple sites to get Mods altogether.
- [Mods saved on Google Drive](https://drive.google.com/drive/folders/1dY20qH3phqoUfmAEdngTzrtMIvPFwSG4?usp=sharing)
- [switch-ptchtxt-mods](https://github.com/theboy181/switch-ptchtxt-mods)
- [Switch-Mods](https://github.com/yuzu-emu/yuzu/wiki/Switch-Mods)
- Additional Note here:
If you got any other names for the folder don't rename it to exefs.
Instead rename them to romfs or romfs_ext.
# Goodbye
Thank you for reading this, I hope it helped you with your start into Switch emulation.
If I forgot something just create a Pull Request with the stuff added and I will review it ASAP.
# List of contributers to the document :D
[PrincessAkira](https://github.com/PrincessAkira) Owner, created this page
[MGThePro](https://github.com/MGThePro) Cleaned up some stuff, fixed typos and links
Mou-Ikkai Fixed a gif
[Descent098](https://github.com/Descent098) Helped clarify the settings to use for the key
sanikdah Cleaned up some images, typos, and wrote this section and the uninstall updates section
[pajamaclaws21](https://github.com/pajamaclaws21)
[NULLYUKI](https://github.com/NULLYUKI) Removed outdated link, changed links to hyperlinks and created hyperlinks for the users in the "List of contributers to the document"